If you have always been wondering how facebook is able to identify and draw boxes around all the faces in a post or how some rectangular boxes mysterious appear on your screen camera around all the faces in the picture, then you are not alone. However, if you stick with me to the end of this article, you will learn how to implement the following.
- Detection of faces in an image.
- Detection of eyes in an image.
- Detection of faces in real-time video stream
to **build a face detection software in python using Haarcascade classifier
In this article, I will try as much as possible to keep things simple without loss of generality because I personally do not like complex stuff and I am sure you too might not.
Without taking much of you time buckle up lets get started.
Heads up!!
The Face and Eye Detection project will be implemented using Haarcascade classifier in openCV.
What is Haarcascade classifier and opencv you must be thinking?
HAARCASCADE CLASSIFIER
Haar Cascade is a machine learning object detection algorithm used to identify objects in an image or video and based on the concept of features proposed by Paul Viola and Michael Jones in their paper “Rapid Object Detection using a Boosted Cascade of Simple Features” in 2001.
It is a machine learning based approach where a cascade function is trained from a lot of positive and negative images. It is then used to detect objects in other images.
The algorithm has four stages:
- Haar Feature Selection
- Creating Integral Images
- Adaboost Training
- Cascading Classifiers
It is well known for being able to detect faces and body parts in an image, but can be trained to identify almost any object. If you are interesting in reading in-depth on HAARCASCADE, here is the original paper.
openCV
OpenCV (Open Source Computer Vision Library) is an open source computer vision and machine learning software library with hundreds of algorithms mainly aimed at real-time computer vision. The library is cross-platform and free for use under the open-source BSD license. OpenCV supports the deep learning frameworks TensorFlow, Torch/PyTorch and Caffe.
Enough of the boring stuff, lets get down to the fun part.
For this project, I am using Ubuntu 18.04.3 LTS operating system with a python virtual environment installed. All codes were written and executed in jupyter notebook
Prerequisites
In order to use opencv library, we need to first install it by running the command below on our command terminal. Based on your operating system the command be slightly different. Just take a second and let google solve that for you.
$ sudo apt-get install python-opencv
Step 1: Import Libraries.
Open up your IDE lets start importing some libraries.
import cv2
import matplotlib.pyplot as plt
The first line of code imports opencv library which will be used for face and eye detection and matplotlib is used to display the images.
Step 2: Initialize HAAR CASCADE Classifier.
#path to face and eye haarcascades  XML files respectively
facePath = '/home/beltus/image/frontalFace10/haarcascade_frontalface_default.xml';
eyePath = '/home/beltus/image/frontalEyes35x16XML/haarcascade_eye.xml'

#Initialize the classifiers
faceCascade = cv2.CascadeClassifier(facePath)
eyeCascade = cv2.CascadeClassifier(eyePath)
We will be using pre-trained Haar cascade models of opencv, so we specify the paths to where his cascade classifiers for both the faces and the eyes lives using the code lines above. This classifier is serialized as an XML file. You can download the XML files from opencv github repository.
The cv2.CascadeClassifier() method is used to deserialize the classifier, load it into memory, and allows us to detect faces and eyes in images as we will see in the next step.
Step 3: Detection of Faces in Image.
Lets first of all read in the image we will be using in our detection pipeline using opencv and display it using matplotlib
#reads the image
image = cv.imread("kid.png")

#display the image
plt.figure(figsize =(14, 10)),
plt.imshow(cv2.cvtColor(img, cv2.COLOR_BGR2RGB))
The image is shown below

To detect the faces in the image, we then call the faceCascade.detectMultiScale() method.
# call to the detectmultiscale function.
face_rects = faceCascade.detectMultiScale(img , scaleFactor = 1.15, minNeighbors = 5, minSize = (20,20));

#loop through all the detected faces and draw a rectangle around the faces.
for i in face_rects:
        cv2.rectangle(img , (i[0], i[1]), (i[0] + i[2] , i[1] + i[3]) , (0, 255 , 0) , 2);

#display detected faces
plt.figure(figsize =(14, 10)), plt.imshow(cv2.cvtColor(img, cv2.COLOR_BGR2RGB))
To give you an idea of what is going on here, the arguments of the detectMultiScale() function are described below:
- scaleFactor
- *minNeighbors**
- minSize
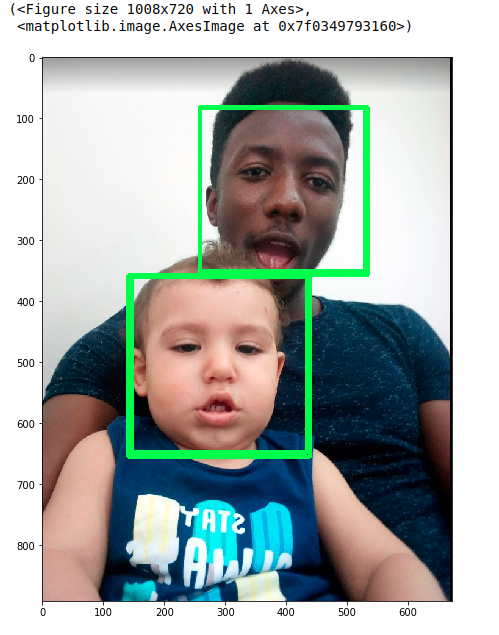
The function returns a list of turple. Each turple with x,y coordinates of detected face and width and height of the detected face. The cv2.rectangle function then draws the bounding boxes on the around the detected faces in the image and the output displayed as can be seen below
#Step 4: Detection of Eyes in Image For the detection of eyes we focus on the regions of the image where a face has been already detected. The code snippets are well commented to explain every line of code.
# loop through all the detected faces
for (x,y,w,h) in face_rects:

    # Draw a rectangle around the faces.
        cv2.rectangle(img, (x, y), (x + w, y + h) , (0, 255 , 0) , 4);

       #section of image where face is found in original image
        roic = img[y:y+ h, x:x+w];

        # detect the eyes in the area of interest.
        eyes = eyeCascade.detectMultiScale(roic, scaleFactor = 1.05, minNeighbors = 5, minSize = (20,20));

        # loop through all the detected eyes
        for (ex, ey , ew ,eh) in eyes:
            # Draw a rectangle around the eyes
            cv2.rectangle(roic, (ex, ey) , (ex+ew , ey+eh), (255,0,0) , 4)

    #display image with bounding boxes
plt.figure(figsize =(14, 10)), plt.imshow(cv2.cvtColor(img, cv2.COLOR_BGR2RGB))
Looking closely at the final output below we see that the faces and eyes have been successfully detected. However, there are some false positives as the computer thinks the kids mouth is an eye, who can blame the computer?. The mouth kind of resembles an eye. Anyways, jokes aside. By tuning the parameters of the of the detectMultiScale function we can significantly reduce the number of false positives. I urge you to play around with those values and see well your detection algorithm performs.
Cleanup Step.
To make things neat and clean, here is the complete code combining all the code snippets above.
#import libraries
import cv2
import matplotlib.pyplot as plt


# path the Haar Cascade pretrain XML files
facePath = '/home/beltus/image/frontalFace10/haarcascade_frontalface_default.xml';
eyePath = '/home/beltus/image/frontalEyes35x16XML/haarcascade_eye.xml'

img = cv2.imread("kid.png")

#display original image
plt.figure(figsize =(14, 10)), plt.imshow(cv2.cvtColor(img, cv2.COLOR_BGR2RGB))

## Initialize instances to CascadeClassifier
faceCascade = cv2.CascadeClassifier(facePath);
eyeCascade = cv2.CascadeClassifier(eyePath)

# Call to the detectmultiscale function.
face_rects = faceCascade.detectMultiScale(img , scaleFactor = 1.15, minNeighbors = 5, minSize = (20,20));

# Detection method loop through all the detected faces
for i in face_rects:
        cv2.rectangle(img , (i[0], i[1]), (i[0] + i[2] , i[1] + i[3]) , (0, 255 , 0) , 2); # Draw a rectangle around the faces.

#display image with detected faces
plt.figure(figsize =(14, 10)), plt.imshow(cv2.cvtColor(img, cv2.COLOR_BGR2RGB))


# loop through all the detected faces
for (x,y,w,h) in face_rects:

    # Draw a rectangle around the faces.
        cv2.rectangle(img, (x, y), (x + w, y + h) , (0, 255 , 0) , 4);

       #section of image where face is found in original image
        roic = img[y:y+ h, x:x+w];

        # detect the eyes in the area of interest.
        eyes = eyeCascade.detectMultiScale(roic, scaleFactor = 1.05, minNeighbors = 5, minSize = (20,20));

        # loop through all the detected eyes
        for (ex, ey , ew ,eh) in eyes:
            # Draw a rectangle around the eyes
            cv2.rectangle(roic, (ex, ey) , (ex+ew , ey+eh), (255,0,0) , 4)

  #display image with detected eyes and faces
plt.figure(figsize =(14, 10)), plt.imshow(cv2.cvtColor(img, cv2.COLOR_BGR2RGB))
If you have made this far, I want you to give yourself a pad in the back because you have just implemented an face and eye detection application using opencv within 10minutes. Pretty cool right?
Lets make this project more exciting and fun by taking it one step further. What about being detecting faces and eyes in pre-recorded video of you and your buddies?
You ready? because I am…
Step 5: Detection of Faces in Video Stream
The fact that video is a sequence of images and we have seen how to detect faces and eyes in an images, simply all we need to do is split the video stream to individual images and for each image apply our detection algorithm we have already implemented above. Here is the complete code for this with explicit comment easy to understand
#path to video file
vidPath = '/home/beltus/Desktop/vision/assets/images/video.mp4'

# Get video supplied by user.
camera = cv2.VideoCapture(vidPath);

#Creates the face detector object and initializes its path to user supplied path
faceObj = cv2.CascadeClassifier(facePath);

while True:
  #reads each frame of the video, grabbed is a boolean indicating if frame was read or not
	(grabbed  , frame) = camera.read();

  # If video is read from a file and frame was not grabbed then video is over and end
	if not grabbed:
		break
	## remember to resize each frame for fast processing
	#width = 300;
	#height = 300;

	#frame = cv2.resize(frame , (width , height), interpolation = cv2.INTER_AREA);
	gray = cv2.cvtColor(frame , cv2.COLOR_BGR2GRAY); # image to gray

  #detect faces in frame
	rects = faceObj.detectMultiScale(gray, scaleFactor = 1.1 , minNeighbors =  4, minSize = (30,30));

   # Make copy just in case we need the original images for some preprocessing
	frameCopy = frame.copy();

 #Draw bounding box around detected face
	for (x,y,w,h) in rects:
		cv2.rectangle(frameCopy, (x,y) , (x+w , y+h) , (0,255,0), 2);

#display image with detected face
	cv2.imshow('FACE', frameCopy);

	if cv2.waitKey(1) & 0xFF == 'q':
		break

camera.release();
cv2.detroyAllWindows();
Leave a comment